
Authors: Jennifer Jacobs, Nadya Peek
Posted: Fri, September 04, 2020 - 11:29:41
The Covid-19 pandemic has fundamentally disrupted learning by requiring a society-wide shift to remote instruction. This shift has raised specific challenges for students and educators in classes that rely on physical making. We teach digital fabrication—a subject that combines computational design tools and computer-controlled fabrication machines. When our campuses in Santa Barbara and Seattle shut down during the start of the pandemic, we had to grapple with a question also facing many other instructors across art, design, science, and engineering: How can students engage in hands-on making without access to workshops, labs, and studios, and the physical equipment, materials, and tools within them?
The following is an account of how we approached this challenge of remote instruction for digital fabrication and our reflections on the experience. In the two weeks between the end of the winter quarter and the start of the spring quarter, we converted our courses from a centralized model that relied on university makerspaces to a distributed model that relied on mini 3D printer makerspaces in students' homes. Our observations from our classes and our own reflections as instructors reveal several trade-offs of structuring a course around an at-home 3D printer. The projects produced by our students hint at how hobbyist equipment can support powerful forms of learning that are less feasible in shared makerspaces. Simultaneously, we found that housing fabrication equipment at home creates new demands and new forms of labor for both students and instructors. By sharing our experience, we hope to provide some practical options for physical prototyping classes during the Covid-19 era. Furthermore, our students’ experience of living and working with 3D printers on a daily basis sheds additional light on the pitfalls, pleasures, and potential of personal fabrication.
What Is Digital Fabrication and Why Do We Teach It?
Digital fabrication encompasses a wide range of design and manufacturing practices, including laser cutting, 3D printing, printed circuit board production, automated knitting, and robotic milling. Digital fabrication technologies are used in an equally broad range of manufacturing domains ranging from architecture, textile production, consumer electronics, woodworking, and ceramics. Despite the diverse applications of digital fabrication technology, all digital fabrication workflows generally center on the same three stages: digitally specifying a design through computer-aided design software (CAD), converting designs to machine instructions via computer-aided manufacturing software (CAM), and producing physical parts through computer-numerically-controlled (CNC) machine operation. This workflow is powerful and distinct from standardized mass-manufacturing techniques such as injection molding because it enables low-volume, custom forms of production without sacrificing accuracy or repeatability [1].
As instructors, we apply CAD, CAM, and CNC tools and technologies toward many different learning opportunities. Learning digital fabrication enables students in art, design, and engineering to develop skills for rapid physical prototyping. Digital fabrication also allows educators to situate computer science, mechanical engineering, mathematics, and other STEM fields in the context of physical making [2,3]. Digital fabrication also supports new forms of design-oriented research and critical making. By creating their own digitally fabricated products, students directly experience the complexity of producing robust, beautiful, and functional artifacts and confront the tensions that emerge when moving between digital representations and physical materials. For this reason, we believe applied digital fabrication is necessary for any student engaged in making research or practice.
“How Are You Going to Teach Digital Fabrication Without a Makerspace?”
The classes we teach—HCDE 598: Digital Fabrication and MAT 549X: Computational Fabrication—make up part of a broader curriculum in interdisciplinary departments that combine engineering, art, design, theory, and practice. HCDE 598 was developed by Nadya Peek within the Human-Centered Design and Engineering (HCDE) department at the University of Washington. HCDE offers a master’s degree that trains students in user experience, human-computer interaction, product design, and interface design. The classes are predominantly scheduled in the evening and many of the students work full-time during the day. HCDE 598 is an elective engineering course designed to introduce students to CAD and prototyping tools for making physical artifacts. Concepts covered include tolerance/fit, flexural design, mold making, and parametric design. Twenty students enrolled in the course in Spring 2020, although typically the class accommodates 40. Two of Nadya’s Ph.D. students TA’ed HCDE 598, although typically the course is allocated one TA.
MAT 594X was developed by Jennifer Jacobs as a course in the the Media Arts and Technology (MAT) graduate department at the University of California, Santa Barbara. MAT 594X targets Ph.D. and master’s students within MAT, as well as graduate students in computer science, and similar to HCDE 598, aims to help students develop prototyping and manufacturing skills for research, art, and design applications. MAT 594X differs from HCDE 598 in its emphasis on computational fabrication; students use programming languages, including Python and Grasshopper, to design for and control digital fabrication machines. Weekly course topics blend computational design methods (e.g., affine transformations, parametric surface representations, topology optimization, and mesh repair) with digital fabrication concepts (e.g., G-Code syntax, CAM simulation, machine calibration, designing for existing objects). Twelve students enrolled in MAT 594X, as is standard in graduate classes in MAT.
Pivoting to remote instruction came at a time of great uncertainty. The start of the pandemic upended higher education and completely changed many aspects of daily life. These changes were all just beginning in late March and early April, near the start of the spring quarter. Restructuring our classes for remote instruction required on-the-fly planning. We managed through trial and error, by implementing the following changes.
What we bought
Pre-pandemic, we had the privilege to teach in university makerspaces, which generally have a large spatial footprint, an established community, and hundreds of thousands of dollars worth of equipment and software. HCDE 598 is normally conducted in the MILL, a UW makerspace that gives students access to laser cutters, 3D printers, CNC mills, water-jet cutters, metalworking tools, sewing/embroidery machines, and shared computers with CAD/CAM software. MAT 594X was scheduled to be conducted with equipment in the Elings Hall Innovation Workshop, a space with laser cutters, desktop CNC mills, and a variety of 3D printers.
Because machine workflows and material outcomes are critical to our course learning outcomes, we focused on pivoting to remote approaches that would preserve some form of hands-on physical fabrication. In this respect, we were somewhat fortunate. Many forms of digital fabrication equipment have become increasingly inexpensive and widespread. Hobbyist-grade 3D printers, in particular, are now available for $200–$300. In other words, it is now possible for students to acquire a no-frills CNC machine for around the same price as an engineering textbook. This opportunity enabled us to restructure our courses from a model that relied on large university digital fabrication workshops to individual (much simpler) digital fabrication workshops in each student’s home. We expanded the class bill-of-materials (BOM) to include equipment and tools that provided the basics of a home makerspace. In both classes, our BOM was centered around Creality Ender 3 Pro, a single extruder, fused-deposition modeling (FDM) 3D printer, which, at the time, cost about $250. In HCDE 598, Nadya’s BOM also included measurement tools such as calipers, hand tools such as box cutters, and materials including 3D-printing filament, casting silicone, plaster, and cardboard. The total BOM, including the printer, was approximately $350. Most items were purchased by students and either shipped directly to their home or hand delivered by Jennifer and Nadya. In MAT 594X, the BOM focused primarily on the printer and starter rolls of filament. Students were periodically shipped new filament as needed, and provided with a $100 materials budget for the final project, which they used to purchase specialty filament, casting materials, and electronic and lighting components. Jennifer used a combination of her own research funds and departmental resources to purchase printers and supplies. These funds would not have been sufficient if MAT 594X had included a larger number of students.
What we taught
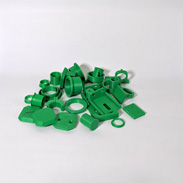
The shift to remote instruction and the loss of university workshop access also required us to redesign our weekly project-based assignments. We had to alter or remove assignments that required unavailable equipment, such as laser cutters, CNC mills, or electronics fabrication. In the process, we focused on ways to adapt many of the concepts that we originally sought to teach. Because HCDE 598 was intended to teach students about critical stages in the fabrication pipeline, Nadya developed new assignments that focused on tolerance/fit, compliant mechanisms, system integration, and tooling geometries to forms that were possible with additive fabrication and at-home equipment. For example, students had to design and 3D print a series of clips that used flexures to hold together cardboard. To demonstrate their clips, they made animated GIFs of themselves shaking a cardboard/clip construction without it falling apart. In MAT594X, Jennifer similarly created new assignments that focused on integrating computer programming with the FDM 3D printing. For example, instead of using an existing slicer software (a program that converts geometry to G-Code for printing), students had to write programs that produced G-Code directly, in a format compatible with the Ender 3 Pro’s controller software.
Kevin Philbin’s clip testing.
While we tried to keep the focus on hands-on making, the lack of additional equipment led both of us to add additional material on software-based CAD, including more complex parametric and generative design, rendering, and simulation. Students in HCDE 598 used Rhino/Grasshopper, Adobe Creative Suite, and Cura (a popular slicer software) on their personal computers for CAD and CAM. MAT 594X was centered on Rhino/Grasshopper and Cura, and Jennifer added Fusion 360, Meshmixer, Meshlab, and mobile-based photogrammetry software for additional generative design and 3D scanning assignments.
We also adjusted the ways we evaluated assignments. We created project grading rubrics that explicitly specified alternative pathways for project completion aside from a completed physical product. For example, in MAT 594X, students could focus on documentation of different (potentially failed) steps, provide substantial peer feedback and support, or focus on a written reflection about how the course concepts aligned with their research objectives. These steps were designed to compensate for the limitations of hobbyist equipment, and the stressors of the pandemic.
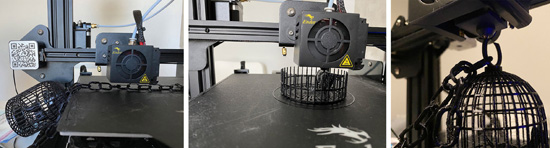
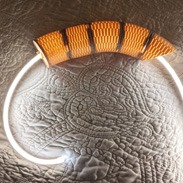
Interlocking chain created by Samuelle Bourgault using Python scripting to generate G-Code. Link
How we taught
Digital fabrication involves a pipeline with many different steps and stumbling blocks across the CAD, CAM, and CNC stages. Pre-pandemic teaching in a workshop had the important benefit of allowing us to highlight detailed or tacit components of the fabrication pipeline in the process of working with a machine. We could also actively respond to issues like material irregularities, tool failure, and machine calibration in person. Like many instructors, the shutdown led us to transition our classes into synchronous and asynchronous components across different platforms and formats.
We both held weekly synchronous class sessions over Zoom: a weekly four-hour session for HCDE, and biweekly one-hour sessions for MAT 594X. These sessions were recorded and made available online following each class. In MAT 594X, synchronous class sessions were shortened in comparison to in-person classes. This resulted in less time for sharing student work, discussing readings, and answering technical questions. Jennifer focused her synchronous sessions on providing high-level overviews of technical content, reviewing a small number of student project outcomes, and touching on highlights from the reading discussions.
The narrow communication bandwidth of online video conferencing technologies limited both the amount and the quality of in-person instruction we could engage in. In particular, we realized early on that we could not respond on the fly to CAD and machine operation issues, or demonstrate complex manufacturing workflows over Zoom. We therefore tried to provide detailed guidance and troubleshooting in advance by preparing higher volumes and more detailed forms of contextual material; This included written technical walkthroughs, prerecorded video tutorials, post-class reminders of important gotchas, and links to additional vetted material students could consult. For example, rather than just providing completed code examples, Jennifer embedded incremental code samples in written step-by-step instructions that added details on software use, and checks to perform prior to fabrication. Nadya regularly checked in on student engagement by conducting weekly anonymous surveys to that included questions on students’ well-being and learning goals.
The absence of a shared physical workshop also resulted in a loss of an important peer learning environment. To compensate, we set up dedicated Slack workspaces for communication outside of the Zoom sessions and actively cultivated the online community by responding to student questions, celebrating in-progress work, and linking to fabrication news and research. We also required students to document their work online. HCDE 598 students were required to document their progress on public Github webpages that were shared with the class. MAT594X students used Google Slides to post reading reflections, and Google Docs or Instructables to publish in-progress and final project outcomes. Peer feedback was a component of students' grades, and was evaluated through the quality and number of comments students gave on Slack, project pages, and online reading reflections.
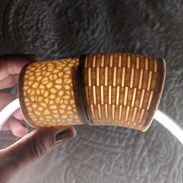
Sölen Kiratli’s iterations on a lamp design that would work with the support structure of the printers. Link
The Effects of Remote Fabrication on Student Experience
Our observations during the course and feedback from our students suggest that remote instruction with distributed hobbyist 3D printers is a viable method for teaching graduate-level digital fabrication courses. In fact, this model may offer unique learning opportunities over courses in centralized makerspaces. However, there were also several undesirable effects that emerged when shifting the workshop from the university to the home.
Learning opportunities of hobbyist machines
The printers we shipped to students had reduced features and capabilities in comparison with industrial equipment in university workshops. They lacked soluble support material, temperature-controlled build chambers, automated calibration settings, and had significantly smaller print volumes, slower print speeds, and reduced accuracy. These factors restricted the size, form, and geometry of the objects the students could produce, which initially caused frustration among some students. Early in MAT59X, several students wondered if different software tools or more advanced machines existed that could ensure successful prints each time. From our prior teaching experience, these reactions are common for newcomers to digital fabrication. All digital fabrication machines, regardless of sophistication, impose constraints and limitations. Producing successful digitally fabricated products requires learning how to design for these constraints. While the hobbyist printers imposed more severe constraints than a $20,000 FDM printer, they still enabled students to learn how to develop design strategies for specific manufacturing processes.
The use of individual hobbyist printers also had advantages when compared with how students access machines in a workshop. Low-cost platforms have the benefit of appearing more approachable to newcomers, and they can significantly reduce the risks of experimentation. Furthermore, unlike staff-managed workshop equipment, individual printers also enabled students to have constant access to the machine, and required them to learn about machine maintenance. Nadya leveraged this opportunity by making the printer’s assembly and initial calibration one of the first assignments in HCDE 598. The printer assembly steps are comparable to those of flat-pack furniture, but the fine-tuning of the machine is key to its performance. To tune the printers, students relied on our assembly documentation, discussed tips and tricks on Slack, and referred to YouTube videos that demonstrated printer-specific tuning methods. By the end of the spring quarter, students in both courses had tuned and modified their machines to a degree that went significantly beyond the manufacturer documentation. This engagement enabled students to familiarize themselves with the machine's implementation details and performance possibilities in a form that would not have been feasible in a shared-use setting.
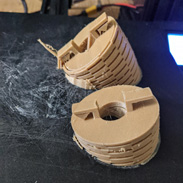
Samuelle Bourgault’s press-fit, modular design. Link
We believe that constant access and freedom to maintain and experiment with a personal machine were factors that directly contributed to the high volume of successful products students created in both classes. We observed that students achieved higher quality 3D-printed parts and greater numbers of design iterations than students in previous classes and workshops who printed on shared machines of comparable quality in shared makerspaces. We also saw students experiment with printing their designs in different orientations and exploring different kinds of trade-offs. For example, Samuelle Bourgault, a student in MAT 594X, printed multiple variations of a design first as a solid part that required an elaborate support structure, and later as a series of modular pieces that required manual assembly, but reduced print time by removing the need for support material. Her strategy was shared with other students who later used it in their own designs. Repeated design iterations were common in both courses and went beyond simple optimizations. Victor Allen, a student in HCDE 598, made piles of different design iterations for a camera mount, experimenting with the material strength and incorporating off-the-shelf parts.
|
|
|
|


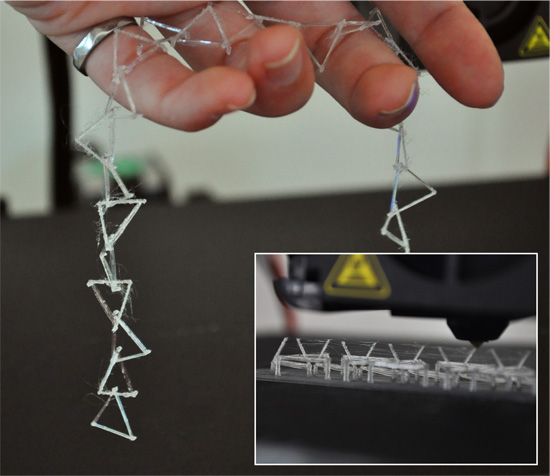
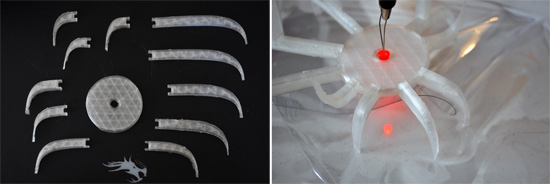
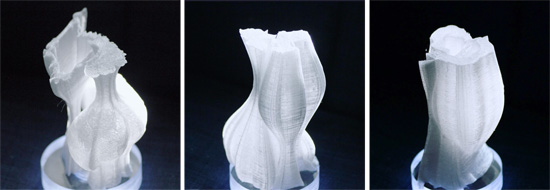
We found that students were able to create different kinds of artifacts by developing custom fabrication processes for their machines. In some cases this involved close integration of manual manipulation and machine fabrication. Yanrong Chen in HCDE 598 created a complex sculpture of interlocking chains and birdhouses, which were printed as interlocking structures by pausing the printer at key moments and inserting previously completed parts. Completing the sculpture involved many tens of hours of print time that were interspersed with regular adjustments or actions made by Yanrong. This process meant that rather than creating a final CAD model of the entire sculpture, she was able to work iteratively, creating a CAD model and printing it only after completing portions of the sculpture and reflecting on their form. In other cases, students extended the functionality of their printers through modifications. Several students in HCDE 598 exchanged components (such as the fans or power supplies) or 3D-printed components to improve performance (such as clips for wire management, holders for work surface illumination, or filament guides). One student in MAT 594X, Mert Toka, modified the interaction of the printer by creating programs that could stream snippets of print commands in real time in response to user input. For his final project he developed a new interface for the printer that used sketching with a tablet to perform semi-real-time operation of the machine. His interface enabled designers to draw freeform curves on different layers, and then produce a series of interpolated curves on the interstitial layers to complete the geometry.
Mert Toka’s interactive drawing CAD-CAM system. Link
In considering these outcomes, it’s worth emphasizing that student learning opportunities were not limited by working with less sophisticated equipment and reduced access to professional facilities. To the contrary, students enacted powerful design workflows and successful project outcomes because they were working with cheap printers in their own homes.

Yanrong Chen’s sculpture of interlocking chains and birdcages. Her approach to using the machine by pausing it during execution and inserting previously-printed parts enabled a novel workflow.
Personal fabrication during a pandemic
Personal fabrication—wherein individuals to fabricate their own devices through digital tools—is an idea that has been present in maker and technology discourse for at least the past 15 years [4]. Attitudes on the potential of personal fabrication are varied. There’s evidence that suggests many present forms of personal fabrication are primarily restricted to wealthy technology enthusiasts [5], which contrasts with projections that personal fabrication could fundamentally alter manufacturing and consumption trends on a societal level [6]. Personal fabrication also garnered new focus during the pandemic, when people with printers (in many cases the same printer we used in our classes) began to manufacture personal protective equipment for healthcare workers, with a mix of results.
|
|
|
|
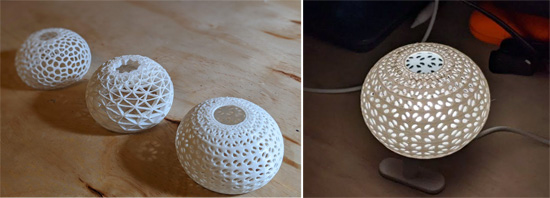
The experiences from our classes offer an alternate case by which to examine personal fabrication. In addition to facilitating hands-on making in a remote instruction context, shipping printers to students’ homes created a situation where students lived with their printers, used them on a daily basis, and created objects for personal use with them. For example, Mengjia Zhu, a MAT 549X student, created a program that generated designs for a self-watering planter that could be adjusted based on the size of the plant and the desired water-immersion level, while incorporating an arbitrary existing outer geometry for the planter basket. Della Sigrest, in HCDE 598, created a modular lamp that integrated with internal lighting components to create different patterns of light diffusion.
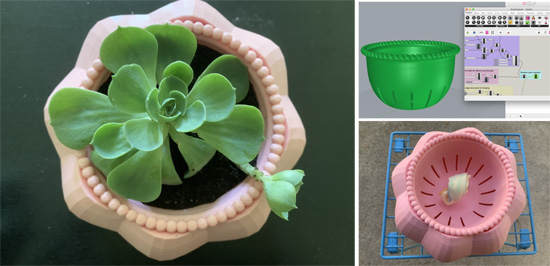
Mengjia Zhu’s parametric self-watering planter. Link
Della’s lamp and Mengjia’s planter are examples of using at-home, affordable digital fabrication machines to support the creation of custom, beautiful, functional artifacts. However, the machines themselves did not simplify or speed up the process of developing these artifacts. Nor did they support fundamentally new design and manufacturing workflows. To the contrary, such products required students to engage in workflows that reflect elements of real-world design, manufacturing, and craft. Mengjia used four different CAD software tools, along with custom code tools to produce her finished planter model, and she performed rigorous material testing and machine tuning to ensure that her final design would be watertight. Della’s final lamp was the result of 12 successive prototypes. At each stage she systematically explored variations of wall thicknesses and geometric patterning. These rich processes contradict product-focused visions of personal fabrication where consumers create custom objects with minimal effort and knowledge. Instead, they show how personal digital fabrication—similar to other forms of personal craft—is often dependent on deep engagement in learning, design, testing, iteration, and peer support. There’s also evidence that suggests this degree of engagement was not simply the result of students needing to complete assignments. Following the completion of the quarter, students in both courses continued using their printers to make personal objects for their homes, employing prototyping, revision, and experimentation in the process.
The presence of the printers in students’ homes also resulted in changes to the students’ routines and daily activities. Initially, cohabitating with a printer led to some playful responses. Many students in HCDE 598 named their printers, and a student in MAT 594X began referring to her printer as her new pet. Other shifts in routines were more serious. Because students often lived with roommates or occupied small studio apartments, they often kept their printers in their bedrooms. This, coupled with long print times and the fact that the printers generated heat, smells, and machine noises while active, resulted in students coordinating their schedules around their printers. Weidi Zhang, a student MAT 594X, kept her printer in her bedroom, and was (reasonably) concerned about letting the printer run while she was sleeping. This created a situation where she only had about 10 hours to print each day, which led to additional stress when prints failed or produced undesirable results. Such experiences were not uncommon. One student had to re-solder the wires on the stepper motors after her cat chewed through them. Another reported that his roommates also had to adjust to the printer, and commented on its constant noise.
It’s not difficult to envision future scenarios where the constraints of continuous operation of an at-home 3D printer would be infeasible for students. Adjusting assignments so they require less print time, or even choosing a different machine with faster fabrication speeds (e.g., a craft vinyl cutter) might be appropriate choices in the future. More broadly, our courses gave us additional insight into the practical reality of at-home “replicator” technology. While digital fabrication technologies will continue to improve, maintenance, safety, and space concerns will persist, and will manifest in specific ways for people living in small, shared spaces.
Pleasure in making at home
There were elements of at-home 3D printing that provided important forms of stress relief and pleasure. Students in both courses repeatedly expressed their delight at being able to make physical objects and seeing the products made by their classmates. They also talked about the enjoyment and satisfaction they experienced with 3D printing in contrast to the challenges of the quarantine and shutdown, or their experience in other classes. Students remained enthusiastic about the act of physical production in their final project reflections, and many continued to use their printers over the summer. These observations align with the well-established sense of pleasure many people experience from physical handicraft [7]. We suspect that the novelty of the at-home 3D-printer setup played some role in the students’ excitement. Yet it’s also possible that at-home fabrication offered rare opportunities for physical interaction when students were otherwise restricted to videoconferences, chat, and screen-based work in their classes and research.
Pleasure and delight are also fundamentally important to students’ overall well-being. The spring of 2020 contained many sources of stress and anxiety for students. Health concerns, social unrest in response to police brutality, isolation, concerns about graduation and career prospects—all of these issues required us to adjust our teaching approach to support students. This involved new forms of emotional and physical labor on our part, including driving supplies to students’ houses, holding more office hours at arbitrary times, and devoting course time for well-being check-ins and discussions of racial justice. The most extreme labor we undertook involved the restructuring of the courses themselves. Although we felt it was unreasonable to rework a lab-based course in less than two weeks, we made the attempt, at the cost of other projects and personal well-being, because we were concerned about our students. We were not alone in this regard: Many of our colleagues made similar sacrifices for student learning and well-being. If remote physical making courses are to be sustainable in the future, we must find ways to provide educators with the adequate resources and support to develop and execute such classes.
Procedurally created lamps by Weidi Zhang created using photogrammetry data. The sculptures were accepted to the 2020 IEEE VIS Art Program. Link
Planning for Future Remote Fabrication Instruction
Covid-19 will impact future education. At the time of this writing, we are both planning for the possibility of teaching digital fabrication remotely in the 2020–2021 academic year. It is also possible that universities and other educational institutions may preserve some elements of remote instruction after the pandemic subsides. Furthermore, the experience of teaching remotely has enabled us to reflect on our past approach to teaching digital fabrication in person. The following are practical lessons we took away from our experience, which will inform our approach to teaching digital fabrication in the future.
Equipment selection and costs
We had positive experiences with the Ender 3 Pro and would use the printer in future classes. Overall, the printer served as a robust platform for newcomers with a higher-than-expected ceiling for more advanced use cases. The Ender 3 Pro uses the widespread, open-source Marlin control software and its hardware design is partially based on the highly popular, iterated, and open source Prusa i3 printer. As a result, tuning tips, replacement parts, and firmware error messages are widely documented and available. We also had better experiences with these machines than other more expensive machines we currently have access to in shared makerspaces, including machines by Dremel, Monoprice, and Makerbot.
A messaging user interface with movable parts cast in plaster by Khang Lee. Link
It’s essential to be transparent about the financial factors of our courses. Remote instruction has already exacerbated inequalities for low-income students and institutions [8]. While the printers we used were significantly cheaper than most printers, we recognize that a several hundred dollar equipment cost per student would present a serious burden for many educators and students. Both of our classes had fewer than 20 students, but cost several thousand dollars total. These costs were borne by a combination of students, faculty, and the university. If we were to teach remote digital fabrication classes in the future, we would consider a $350 per student material and machine budget a baseline requirement. Requiring students to cover that cost themselves would be detrimental for student equity and inclusion. We strongly believe the learning opportunities of remote fabrication courses merit institutional funding, but we also recognize that resource constraints will not make this feasible in many cases.
Building a curriculum with multiple pathways
We found that it was crucial to make the coursework accessible and adaptable to the changing situation. We offered flexible fabrication assignments that allowed for multiple levels of engagement. We designed assignments to prompt students to demonstrate course concepts, but left it open for students to choose the application and degree of complexity. For example, an early assignment in Nadya’s course was for students to design cookie cutters. A simple circle would have met the assignment criteria, but many students took the assignment as an opportunity to design and print a highly personalized and complex series of cookie cutters. This enabled them to be creative and invested while also tailoring their projects to the bandwidth they had available that week.
Helping students complete the coursework remotely also required a different approach. Working from home creates competing demands on time and attention (in different degrees for different students), and the challenge of learning physical and tacit forms of production in isolation with limited resources heightens these demands. We compensated for these constraints by providing flexible, asynchronous, and high-bandwidth forms of course engagement, including expanded office hours, peer technical support, expansive written documentation, and multi-tiered assignments. Based on student feedback and course outcomes, we believe these instructional factors were equally critical in achieving student learning outcomes as the printers themselves.
|
|
|
We recognize that written instruction materials, online documentation of student projects, asynchronous communication platforms, and peer support and feedback are often components of in-person courses (our past courses included). However, the pandemic required us to rely on these elements in a new way. Rather than serve as a means to reinforce content and interactions from in-person class sessions, we depended on asynchronous platforms to provide essential forms of support and instruction that would not have been possible in remote synchronous lectures or demonstrations. Furthermore, the quantity of support we provided was substantially greater than that of previous in-person classes. We strongly suspect that both the variety and quantity of learning support provided in our remote classes would also improve learning outcomes in in-person digital fabrication courses. However, these efforts required substantially more instructor labor, not all of which can be rolled over into future courses.
Integrating well-being and learning concerns
We are still in a crisis. Initial attempts to re-open universities to students have shown the significant health and safety risks of resuming regular campus operations. Like the courses of our colleagues, our classes were first and foremost a method for safely teaching physical making without any in-person elements. Setting up mini-makerspaces in student homes enabled that. But in addition to the critical safety benefit of avoiding in-person contact, we believe the success of our courses hinged on being attentive to other forms of student well-being. Regular check-ins and peer learning components were designed to cultivate a sense of community and engagement. Flexible expectations on assignments and course attendance were designed to accommodate students’ need for privacy and rest and to account for the competing demands on their time at home. These considerations for student well-being cannot be disentangled from the learning objectives and outcomes of our courses.
In our remote digital fabrication classes we were still able to teach the core elements of CAD, CAM, and CNC production. We are proud of our students’ work and the efforts they took to support one another. Although our approach is new, we suspect that the potential of remote digital fabrication instruction is broad. At-home mini-makerspaces could offer remote learning opportunities for students across art, engineering, science, and design departments. Furthermore, this model may offer new learning opportunities in machine operation and maintenance, experimentation, and design iteration that are less feasible in shared makerspaces. Yet if we wish to create future learning opportunities that are sustainable for instructors and effective for students, it is also necessary to be realistic about the substantial costs and labor that remote fabrication entails. As our collective experiment with remote learning continues, it is our sincere hope that physical making classes will not disappear, and the safety and well-being of students, staff, and faculty will be maintained.
Endnotes
1. Thompson, R. Manufacturing Processes for Design Professionals. Thames & Hudson, London, 2007.
2. Jacobs, J. and Buechley, L. Codeable objects: Computational design and digital fabrication for novice programmers. Proc. of the SIGCHI Conference on Human Factors in Computing Systems. ACM, New York, 2013, 1589–1598; >https://doi.org/10.1145/2470654.2466211
3. Peek, N., Coleman, J., Moyer, I., and Gershenfeld, N. Cardboard machine kit: Modules for the rapid prototyping of rapid prototyping machines. Proc. of the 2017 CHI Conference on Human Factors in Computing Systems. ACM, New York, 2017, 3657–3668.
4. Gershenfeld, N. How to make almost anything: The digital fabrication revolution. Foreign Aff. 91, 43 (2012).
5. Buechley, L. Thinking about making. Presented at EYEO 2014; http://leahbuechley.com/?p=16
6. Anderson, C. In the next industrial revolution, atoms are the new bits. Wired, Jan. 25, 2010; >https://www.wired.com/2010/01/ff_newrevolution/
7. McCullough, M. Abstracting Craft: The Practiced Digital Hand. MIT Press, U.K., 1998.
8. Goldstein, D., Popescu, A., and Hannah-Jones, N. As school moves online, many students stay logged out. The New York Times. Apr. 6, 2020; https://www.nytimes.com/2020/04/06/us/coronavirus-schools-attendance-absent.html
Posted in: Covid-19 on Fri, September 04, 2020 - 11:29:41
Jennifer Jacobs

View All Jennifer Jacobs's Posts
Nadya Peek
View All Nadya Peek's Posts


Post Comment
@James (2024 07 09)
The crisis still affects us. Resuming regular campus operations carries major health and safety hazards, as demonstrated by the initial attempts to reopen universities to students. See: driveway resurfacing contractors
@Free AI Tools Free AI Tools (2024 12 16)
Thanks for this article, it is well written Remote Software JobsFree AI Tools
Latest Merch Deals Thank you for sharing;
@SevynFrankie (2025 05 15)
Remote digital fabrication instruction during the pandemic taught me adaptability and innovation. Despite distance, I stayed connected to hands-on learning by https://www.almaaftercare.com/ using local materials and online guidance. This approach not only sustained my skills but also highlighted the potential of blending remote education with community resources for effective, practical training.
@Sophia Smith (2025 08 25)
This article highlights a really creative and practical approach to keeping hands-on learning alive Take Care Of Shadow Milk during the pandemic—it’s inspiring to see how home-based 3D printers and thoughtful course redesigns can still give students a rich, tactile learning experience.
@take care of shadow milk scratch (2025 08 25)
take care of shadow milk invites you to explore rooms to unlock unique interactions with Shadow Milk Cookie.
@peter (2025 09 09)
This article offers a practical look at how remote digital fabrication worked during the pandemic. It’s insightful to see the challenges and unexpected benefits of at-home 3D printing for students. A really thought-provoking read! Take Care of Shadow Milk
@MarvinLouie (2025 10 18)
Looking to boost your website’s authority and visibility? A guest posts service is a powerful tool that can help you achieve that. By publishing high-quality content on reputable sites, you not only gain backlinks but also increase traffic and credibility. This service is essential for anyone aiming to grow their online presence through organic SEO efforts.